Git push is the best thing for deployments since sliced bread. I don’t know if sliced bread was ever a deployment requirement, but trust me it’s good. I used to work at a company that used a similar stack (svn+rsync) to deploy. I’m glad to see many hosting companies getting on board with git-push. May you never have to use FTP again!
We have an account at SiteGround, which provides git push, but implemented in a different way than others like WPEngine. If you’re not careful with how you use it, it can lead to some strange results. I’d like to highlight some of the differences, so you don’t get yourself into trouble – especially if you don’t want core WP files to be under version control.
Navigating SiteGround’s cPanel
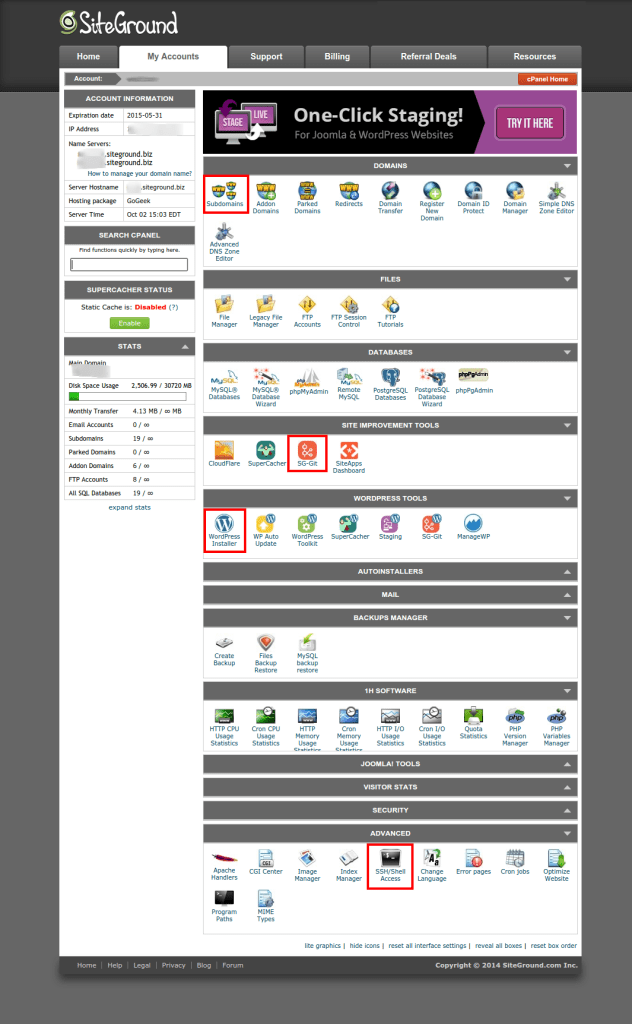
SiteGround uses the classic cPanel interface. To help you navigate, I’ve highlighted the areas of interest:
Creating a subdomain
If you haven’t done so yet, you may want to create a subdomain for your install. We use a single domain at SiteGround and put several WP installs using subdomains for testing purposes. Here’s what the subdomain configuration looks like:
If you’re setting up a WP install using your main domain name, you can skip creating a subdomain.
Creating your WordPress instance at SiteGround
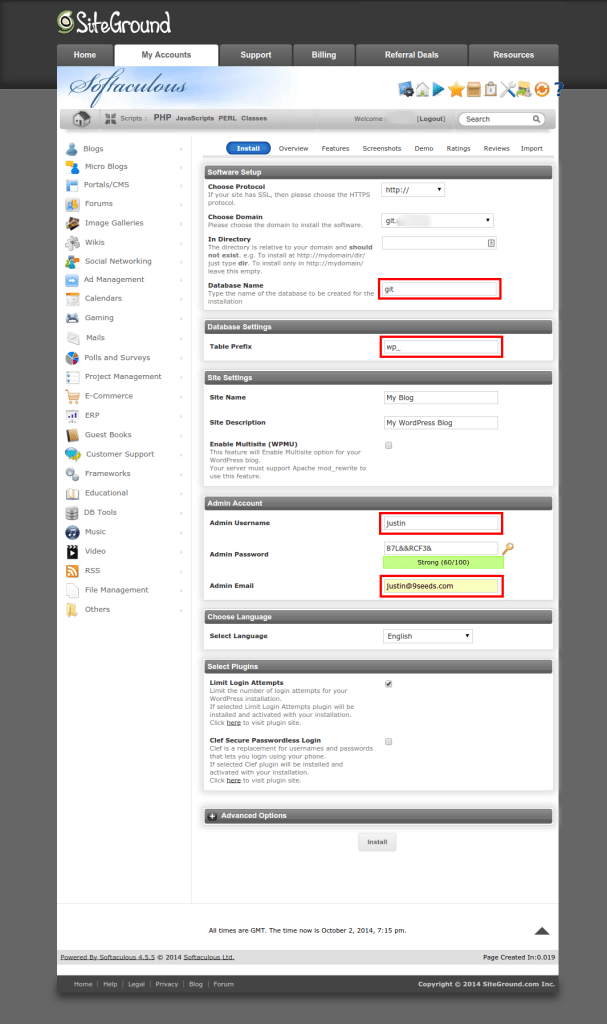
When you go to add WordPress to your domain through cPanel, you’ll be using a tool called “Softaculous.” Click the big blue Install button to get started:
Select the domain (or subdomain) that you want to turn into a WP install.
Remember to change:
- Database name – it will be auto-generated, I tend to choose something that matches the domain or subdomain so it’s easy to remember what it goes with.
- Table Prefix – I use the normal
wp_– I think changing this has become “security through obscurity” and if you don’t keep your site up to date, this is unlikely to save you from an attack. - Admin Username – replace the auto-generated username with something useful, but avoid admin since it is easily targeted by attackers
- Admin Email – replace the auto-generated one with a real email address for the site administrator.
When the installation is done, to exit Softaculous and get back to the regular cPanel, just click the My Accounts tab at the top and then click the red Go to cPanel button.
Creating the git repository at SiteGround
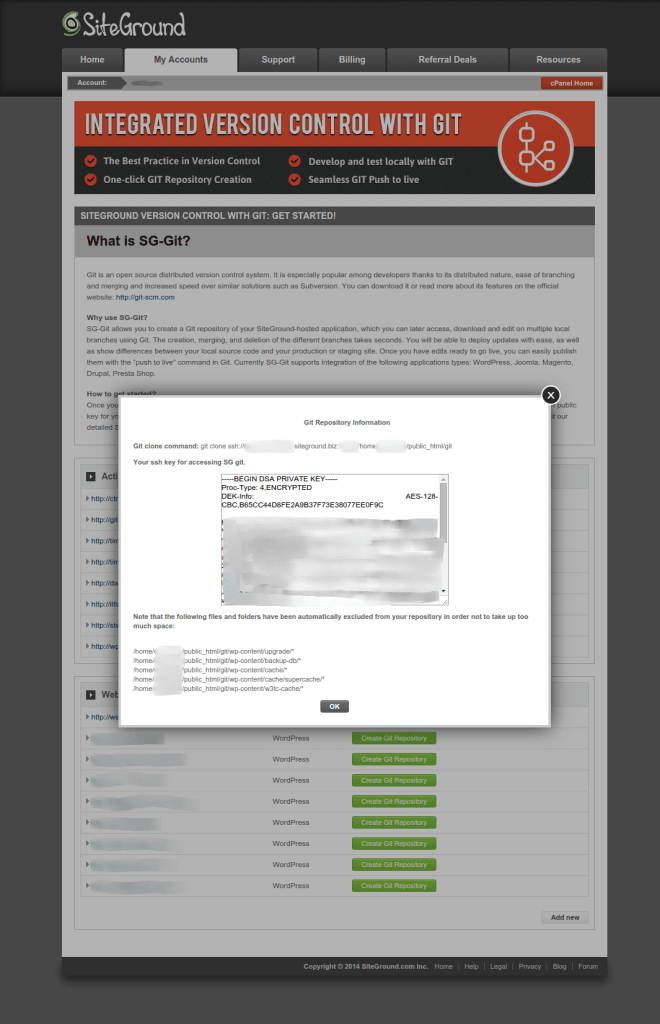
Click the SG-Git icon on from cPanel. You’ll be brought to a screen where all of your WordPress installations are displayed, and if they don’t have git repositories associated with them, you’ll be given the option to create one. When you click Create Git Repository for your WP install, a dialog will come up with some git information. Record the git clone command, we’ll use it later.
There will also be a SSH key and possibly the passphrase that goes along with it. Rather than using this key and sharing it with all the developers who you want to be able to push to this SiteGround account, I find it easier to add individual keys via cPanel.
Setting up SSH keys and config
SiteGround only takes DSA keys for SSH. If you don’t have an id_dsa.pub file in your ~/.ssh directory, you can create one by opening a terminal and running:
ssh-keygen -t dsa
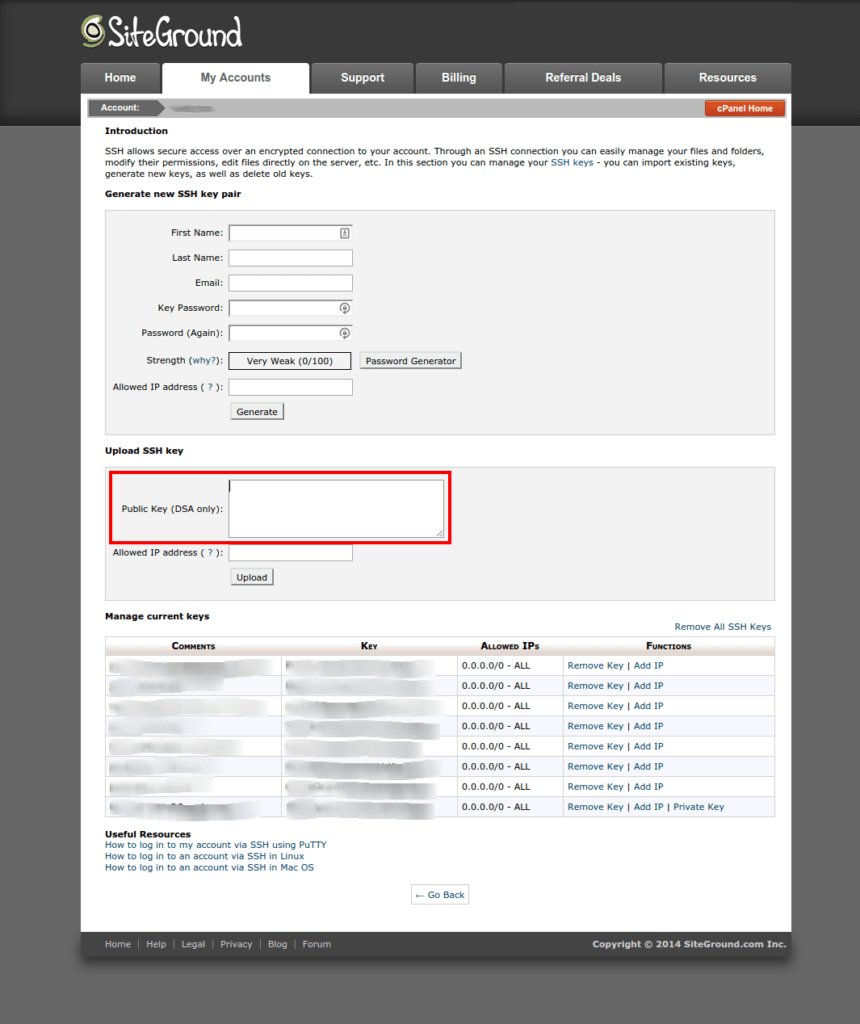
Once your DSA key is generated, you can add it to the SiteGround control panel by clicking the SSH/Shell Access icon in cPanel. Copy the contents of your ~/.ssh/id_dsa.pub file and paste it into the text area on SiteGround:
Some git clients won’t accept the fact that SiteGround uses a non-standard port for SSH. The way to get around this is to create a ~/.ssh/config file with an entry for SiteGround. If the git clone command SiteGround supplied looks like:
git clone ssh://sguser@mXX.siteground.biz:18765/home/sguser/public_html/git
Then your ~/.ssh/config file should contain:
Host mXX.siteground.biz
        HostName mXX.siteground.biz
        Port 18765
        User sguser
Replace the Host, HostName, and User values with those from your account. I’ve changed them in this example for security purposes. To test you should be able to:
ssh mXX.siteground.biz
Notice you shouldn’t have to supply the username or the port, my ~/.ssh/config takes care of that. If you didn’t add a passphrase to your DSA key, you should be logged into SiteGround without having to supply a passphrase. Press Control-D to log out.
Now your git endpoint can be simplified for your git client (username and port are removed):
ssh://mXX.siteground.biz/home/sguser/public_html/git
But don’t clone it just yet!
How not to push, and what will happen
The normal Git push workflow (for me) would be to init a git repository on my local system, add an origin of bitbucket.org or github.com and push it there, then add remotes (such as WPEngine production and staging) and proceed to push to those remotes. Instead I added SiteGround as a remote named sg-remote.
Origin vs. Endpoint
They key difference between SiteGround and WPEngine is that SiteGround treats their git repository as an origin (where you can pull and push), where WPEngine is a --bare endpoint that you can only push to.
Since SiteGround is set up as an origin, if you just try to push there (without pulling or cloning from SiteGround first), you’ll likely get a warning like:
Updates were rejected because the remote contains work that you do not have locally.
Per git’s recommendation, you might then try to pull:
git pull sg-staging master
If your git repository was set up to not track WP core files, you’ll get a warning that:
error: The following untracked working tree files would be overwritten by merge:
index.php
license.txt
readme.html
wp-activate.php
wp-admin/about.php
...
Aborting
This is because the core WP files have been added to the SG-git repo, but not your local one. So then if your next move is:
git push sg-staging master --force
Several important files will be removed on your WP install at SiteGround: all of wp-admin, wp-config.php, and all other PHP files in the webroot folder. Needless to say, your WordPress instance will no longer function without some serious repair.
Git push to SiteGround (modified functional workflow)
Since SiteGround sets up the git repository as an origin, it is better to start your WP project with a git clone from SiteGround, but before doing that, I wanted to clean things up…
If you don’t want core WP files under version control, the easiest solution is to remove them from version control directly at SiteGround before cloning the repo.
Since we’ve already got SSH working, from your terminal you can:
ssh mXX.siteground.biz
cd /home/sguser/public_html/git
git rm --cached -r wp-admin/ wp-includes/ *.php *.txt *.html
git commit -a -m "Removed WP-Core files"
Again, replace the host (ssh line) and path (cd line) with the values from your git clone command supplied by SiteGround. The ones used here are examples. The git rm --cached command removes the core WP files from revision control, but leaves them on the filesystem, so your installation doesn’t go into a state of disrepair (like above).
Once that is done, you can clone!
git clone ssh://mXX.siteground.biz/home/sguser/public_html/git
SiteGround will be the origin, so let’s edit that (usually bitbucket.org or github.com is the true origin). This will rename it to sg-remote:
git remote rename origin sg-remote
Now when you want to push to SiteGround, just do:
git push sg-remote master
If you try to push a different branch to SiteGround, the branch will be transferred, but the code won’t be switched to that branch. To get around this you can overwrite SiteGround master by doing:
git push sg-remote my-branch:master
Hopefully this gives you some insight into how the SiteGround git deployments work, so you can use them effectively.
If you’re interesting in learning more about git deployments or how to set up your own git-push-to-deploy, I recommend starting with this article to familiarize yourself with a basic setup:


